26 January 2011

Chocolate Birthday Cake...Redux

The prettiest part of a not-so-pretty birthday cake for my buddy, Liz.  
My littlest one had taken one of his signature catnaps and needed to be cuddled most of the afternoon.  Baby in one hand + piping bag in the other = CakeWreck. 
Three layer chocolate birthday cake filled with mocha ganache and iced with browned buttercream. 
Do you see that moist, tender crumb?  TYVM, EGGS. 
    So, remember this cake?  Well, as tasty and easy as it was, I wasn't 100% satisfied with it. The crust on the cake leaned a little too far towards tough, which is never a good quality in a cake.  Check out the photo of the unfrosted cake...do you see how the sides look almost matte?  I was missing the lovely, shiny, slightly crisp edge of a well made butter cake.

     The thing is, I've been really reluctant to make any major changes or add special ingredients like sour cream or buttermilk (both of which can make a cake more moist and tender).  The beauty of this cake is in it's simplicity and ease of preparation.  I love that it can be made with only what most people have on hand.  Still, as a cake perfectionist, I couldn't help but change just a couple of things that I hoped would make at least a little difference:

  1. I beat a couple of eggs and mixed them in with the oil and cooled cocoa/water mixture
  2. When adding the eggs, the overall amount of liquid in the batter was increased by about 1/2 cup (which is the approximate volume of two eggs), so I just reduced the water to 2 1/2 cups.  

These two changes, as simple as they were, made a major difference in the texture and flavor of the cake without taking away what I love most about it.
  
While the original cake had merit in that it was:
(A) Easy, (B) Quick, (C) Tasty, (D) Sturdy and (E) Made from ingredients you can find in your pantry;

Version 2.0 has merit in that it is the following:
 (A) Easy, (B) Quick, (C) even MORE delicious, (D) Sturdy and (E) refer to C.


Easy Chocolate Layer Cake*
Makes 3 8in. layers or 36 cupcakes
*Note: I filled this cake with a very simple mocha ganache and iced it with browned buttercream (in robin's egg blue).  I didn't use recipes for either but would be happy to write one down and post it if anyone's interested.  Leave me a comment if you'd like some help with a recipe for one or the other!

Ingredients:

  • 4 1/2 cups sifted all-purpose flour
  • 3 teaspoons baking soda
  • 1 teaspoon salt
  • 2 3/4 cups granulated sugar
  • 1 cup unsweetened cocoa powder
  • 2 1/2 cups hot water
  • 1 cup vegetable oil
  • 2 eggs, beaten
  • 3 tsp vanilla extract
  • 1 1/c cups chocolate chips

Directions:

  1. Preheat oven to 350 degrees F.
  2. Grease 3-8in. round cake pans.  Line the bottoms with greased parchment.  Dust pans and parchment with flour, tapping out excess.
  3. In a medium bowl, whisk together hot water and cocoa powder.  Let sit for 10 minutes to allow the cocoa to bloom and the mixture to cool slightly.  
  4. Whisk in oil, eggs and vanilla extract.
  5. In a large bowl, sift together flour, sugar, baking soda and salt.
  6. Mix wet ingredients into dry, stirring until just combined. Stir in chocolate chips.
  7. Divide evenly between 3 prepared cake pans.  Bake at 350 degrees F for about 30 min or until tops spring back when pressed lightly and toothpick inserted in center of cakes comes out clean. Do not overbake. 
  8. Immediately run a knife around the edges of each pan and let cool in pans for 15 min.  Remove from pans and transfer to wire racks to cool completely. 
  9. When completely cooled, ice with your favorite buttercream. 

And now, some gratuitous pictures of my babies and our life over the past week:


22 January 2011

Very simple, Pantry Chocolate Layer Cake


A tiny (4 in.) owl chocolate birthday cake, iced with strawberry buttercream.

Strawberry buttercream = regular American buttercream flavored with strained strawberry puree 

The wee-est little chocolate cake with the top lopped off.  
Just before torted (i.e. sliced) it into two layers and filled and frosted it with strawberry buttercream. 


    This is my new go-to chocolate cake recipe.  It is a delicious, chocolatey, quick and easy way to get a big (READ: 3 layers!) chocolate cake fix.  I used it to bake 18 standard cupcakes, 48 minis and still had plenty leftover to make a tiny, 4 in. two layer cake.  The flavor is fantastic and rich, yet simple.   This isn't Jaques Torres' chocolate cake.  It's a friendly, happy, kid's-birthday-party kind of a chocolate cake.  I love it.  
(Sidenote: If you use a non-dairy frosting, made with shortening or "buttery spread" (recommended: Earth Balance) instead of butter, this can be a wonderful celebration cake for your vegan friends!)

If you're just starting to bake layer cakes, this is a fantastic "gateway" cake. 
1) The texture is light and spongy but still sturdy enough to be easily torted.  You can stick with three layers but for more of a showstopper effect, each layer can be split very easily into two, for a super tall 6-layer cake. 
2) There is zero creaming involved.  In fact, you don't even really need a mixer.  
3) Even better, you only really NEED to use ONE bowl.  
4) With a full cup of cocoa in the batter, it packs a nice chocolately punch without having to mess with melting chocolate.  
5) You don't have to wait for ingredients to reach room temperature.  Every ingredient in this recipe can come straight out of your pantry.  (sidenote: does the word "pantry" make anyone else giggle?)

   All this cake really needs to make you happy is a couple of bowls, a spoonula, some cake pans, an oven and a delicious buttercream (or perhaps, a ganache?).  It's the perfect cake to make when, like me, you are short on time, counterspace and available hands.  

Easy Chocolate Layer Cake
Makes 3-8in. layers or 36 cupcakes

Ingredients:

  • 4 1/2 cups sifted all-purpose flour
  • 3 teaspoons baking soda
  • 1 teaspoon salt
  • 2 3/4 cups granulated sugar
  • 1 cup unsweetened cocoa powder
  • 3 cups hot water
  • 1 cup vegetable oil
  • 3 tsp vanilla extract
  • 1 1/c cups chocolate chips

Directions:

  1. Preheat oven to 350 degrees F.
  2. Grease 3-8in. round cake pans.  Line the bottoms with greased parchment.  Dust pans and parchment with flour, tapping out excess.
  3. In a medium bowl, whisk together hot water and cocoa powder.  Let sit for 5 minutes to cool slightly.  
  4. Whisk in oil and vanilla extract.
  5. In a large bowl, sift together flour, baking soda and salt. Add sugar and whisk together.
  6. Mix wet ingredients into dry, stirring until just combined. Stir in chocolate chips.
  7. Divide evenly between 3 prepared cake pans.  Bake at 350 degrees F for about 30 min or until tops spring back when pressed lightly and toothpick inserted in center of cakes comes out clean. Do not overbake. 
  8. Immediately run a knife around the edges of each pan and let cool in pans for 15 min.  Remove from pans and transfer to wire racks to cool completely. 
  9. When completely cooled, ice with your favorite buttercream. 


18 January 2011

Whole-Wheat Apple Carrot Muffins (or bread)


    If you've spent any time here, you might have noticed I have a thing for baked goods.  More specifically, I. love. cake.  In fact, cake in almost any form, whether it be sky-high layers, cutesy cupcakes or diminutive petit fours, is, hands down, my favorite food.  Unfortunately there are times when it's not a good idea to have your cake and eat it too, so to speak.  For example, it's usually a good idea to include foods other than cake for, say, breakfast, lunch and dinner (okay, so that would be most of the time).  Since I teach group fitness classes regularly, I realize the need to be fueled with a wide variety of nutrients beyond butter, sugar and flour in order to function well and feel good.   Also, I would like to someday fit back into my pre-pregnancy pants and let's just say that right now, THINGS ARE NOT LOOKING GOOD.  

    Well, thank goodness for healthy muffins and quick bread.  They are quick and easy to whip up, can be filled with all sorts of healthy add-ins, don't require frosting and can be eaten at almost any time of day!  Most importantly, they are somewhat reminiscent of CAKE!  These muffins in particular, are actually a little reminiscent of carrot cake and would be even more so if topped with some fluffy cream cheese.  In other words, they are a lovely, delicious and actually quite healthy way to start your morning or fuel up your afternoon without resorting to buttercream.  

Whole-Wheat Apple Carrot Muffins

Makes 18 standard-sized muffins or one large loaf of bread. 
Note: Since we can't eat 18 muffins in one day, I like to store them in a freezer-safe airtight container, in the freezer.  This helps the muffins stay fresh longer and keeps them ready for quick breakfasts whenever we need them. Thaw/warm one or two at a time in the microwave for about 30 seconds at 50% power.

Ingredients:

  • 2 cups white whole-wheat flour
  • 1 teaspoon baking soda
  • 1 tsp cinnamon
  • dash of nutmeg
  • 1/4 tsp ground ginger
  • 1/2 tsp salt
  • 1/2 cup dark brown sugar 
  • 1 1/4 cups buttermilk
  • 2 eggs
  • 1/3 cup vegetable oil
  • 1 tsp. vanilla
  • 1 cup cereal flakes (I used Flax Plus Multi bran flakes but any bran flake would work)
  • 3/4 cup finely chopped apple
  • 3/4 cup shredded carrot
  • 1/2 cup raisins
  • 1/2 cup chopped pecans 
  • 3 T turbinado sugar 

Directions:

  1. Preheat oven to 350.
  2. Line 18 muffin cups with muffin liners
  3. Whisk together the flour, baking soda, spices, salt and sugar in a medium bowl.
  4. In a large bowl, whisk together buttermilk, eggs, oil and vanilla until creamy.
  5. Stir in cereal.  
  6. Gently stir dry ingredients into wet with a rubber spatula until the batter is just combined.
  7. Fold in fruit and pecans.
  8. Divide evenly into muffin cups (they will be pretty full), sprinkle tops with a little turbinado sugar.
  9. Bake at 350 for 18-20 minutes for muffins, 50-60 min for bread or when tops spring back when lightly pressed.
Source: moi.

17 January 2011

Beef Stew with Cognac and Roasted Vegetables (and a quick browning tutorial)

"Waiter, there's a tree in my stew."

As it turns out, my extremely limited food photography skillz made it difficult for me to capture an appealing picture of beef stew.  But rosemary is pretty!  And also one of the ingredients!

See the bit of beef on the right?  It's brown, but not BROWNED. The piece on the left is going to give your stew much more flavor.  You want all of your stew meat to look like this before adding the onions, carrots and garlic and deglazing the pan.  

Carrots and garlic...add after sweating the onions and about 1 min before deglazing the pan.

Organic beef stock base

A cast of characters...er, herbs. 

Homemade whole-wheat bread from the book, Healthy Artisan Bread in Five Minutes a Day
If you like making your own bread, you must check out this book!  You basically just stir the ingredients together in a big bowl, let it rise for a bit, then throw the whole batch into the fridge until you're ready to shape and bake.  The method is as easy as using a bread machine but the bread is so. much. yummier. 
Check out the blog for more info!  


NOTE A:  This isn't much of a recipe b/c quite honestly, I threw it together late one afternoon based on what sounded tasty to me.  But I suspect most of you reading this don't follow recipes that closely anyway, so hopefully the bare bones will give you enough info to work with.  Feel free to comment if you have any questions!
NOTE B: This was a two-day process and TOTALLY worth it.  I cooked most of the stew on a Monday afternoon, let it cool a bit and then threw it in the refrigerator overnight.  The next evening all I had to do was roast off the potatoes and mushrooms, warm up the stew and stir it all together with a little fresh rosemary before serving.  Like most soups/stews, the flavors were so much more intense after giving it a chance to hang out for 24 hours.  


Beef Stew with Cognac and Roasted Vegetables
4 servings

Ingredients for stew:
  • 1 lb. beef stew meat, cut into bite-sized pieces 
  • 2 T flour 
  • 1/2 tsp salt 
  • 1/2 tsp fresh ground pepper 
  • 1 T olive oil 
  • 1 T unsalted butter 
  • 1 medium onion, chopped 
  • 2 cloves garlic
  • 2 medium carrots 
  • 3-4 cups beef stock 
  • 1/2-3/4 cup dry red wine 
  • 1/4 cup cognac  
  • 1 tsp dried rosemary 
  • 1 tsp dried parsley 
  • 1 bay leaf 
  • 1/4 tsp gr. mustard 
  • fresh rosemary (2-3 T) 

Roasted Veggies:
  • 1 large russet potato, cleaned and diced (I prefer to keep the skin on!)
  • 1 1/2 cups cremini mushrooms, cleaned, stems removed 
  • 1 T balsamic vinegar 
  • olive oil, salt, pepper  

Directions:
1. Toss the beef with the flour, salt and pepper
2. Heat dutch oven or heavy stockpot over med-high heat until HOT.
3. Coat the pan with the oil and butter then add beef, in one layer, making sure each piece has at least one side touching the pan.
4. Let sit and get nicely browned (see photo) on at least one side before using tongs to turn each piece.
5. When all beef is mostly browned, move to the sides of the pan and toss onion into the center of the pan, stirring lightly.  Add more oil if necessary.
6. When onions are translucent, stir in carrots and garlic.  Stir and cook for about 1 min. or until garlic is fragrant.
7. Deglaze the pan with the wine and cognac, scraping up browned bits from the bottom of the pan.  
8. Stir in stock, dried rosemary, dried parsley, the bay leaf and ground mustard. 
9. Bring to a boil.
10. Reduce heat to low, cover and let simmer for about 3 hours, stirring when necessary. 
11.  Turn off heat, cool slightly and refrigerate overnight.


Before serving
1. Preheat oven to 400 degrees.
2. Toss potatoes with oil, salt and pepper.  Roast for about 45-60 min or until browned. 
3. Toss mushrooms with oil, salt, pepper and balsamic.  Roast for about 20 min.  (Do this just before serving.)
4. Heat stew on low until warmed through.  Check for seasonings and add more salt/pepper if necessary.  5. Stir in roasted potatoes, mushrooms and fresh rosemary.
6.  Serve in deep bowls with fat pieces of crusty bread with butter.  Preferably on a cold, winter day. 

06 January 2011

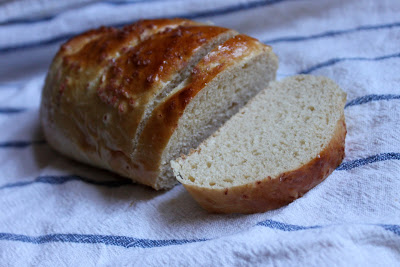
6:365:2011 Fresh Baked Bread


6 days into the New Year and I'm already on successful batch #2.

Batch #1 (made on 2:365:2011) was my first successful yeast dough.  Ever.

 This photo is of the 1/2-whole-grain version of an incredibly easy "roll" dough recipe that I found deep within the stacks of long-forgotten, old family recipes.  It's a little like a "poor-man's brioche," if you will.

And if I can pull myself away from baking/eating this supremely delicious, no-knead, bread/dinner roll/cinnamon roll/whathaveyou dough long enough, I'll try to post the recipe here, with some photo-evidence that I actually was the one who baked this.  A successful YEAST bread!  By hand!  From scratch!!!  Made by me!!!!

:::marks it off of her bucket list::::

Stay tuned for the recipe...

03 January 2011

Fresh Cranberry Muffins

I never knew how lucky we were to live in an age of modern conveniences until we lived out of a cooler for 6 WEEKS.  (Long-story-short: about a year and a half ago we bought a "new" fridge. It had to be serviced no less than 7 times in twice as many months and in November, was pronounced "unrepairable" by our now-familiar appliance repairman.   God Bless "Jo" at the Whirlpool Headquarters who recognized our plight and agreed to send us a new, working unit)  FINALLY,  after miles of red tape and holiday delays, our brand-spanking new frigidaire arrived last week, courtesy of Whirlpool.  It was followed by an epic grocery trip.

Call me a nerd but the general process and outcome of a routine refrigerator clean-out is oddly cathartic to me.  Seeing those nearly empty shelves, just waiting to be filled, is (to me) the embodiment of optimism.  It's the promise of a fresh start in one of the most basic areas of need that I can fill for my family: wholesome, satisfying, nourishing and hopefully yummy meals.  So when I had the opportunity to begin again with a completely new refrigerator I was nearly giddy!  What better way to start the New Year (and decade) that with a totally clean slate in one of my favorite areas of the house???

Is there a part of your home/world where you'd like to start fresh this January?

Fresh Cranberry Muffins

Makes 18 standard sized muffins.

Ingredients
  • 1/2 cup (1 stick) unsalted butter, room temperature, plus more for pan
  • 2 cups all-purpose flour
  • 1 1/2 teaspoons baking powder
  • 1/2 teaspoon salt
  • 1/2 tsp ground ginger
  • 1 1/2 cups fresh cranberries, chopped
  • 1/2 cup granulated sugar
  • 1/2 cup brown sugar, packed
  • 2 large eggs
  • 2 teaspoons pure vanilla extract
  • 1/2 cup milk
  • zest from one small orange
  • 3 T turbinado sugar (optional)

Directions

  1. Preheat oven to 350 degrees. Line 18 muffin cups with paper liners.  In a medium bowl, whisk together flour, baking powder, salt and ginger. Working over the bowl, toss cranberries in a fine sieve with about 1 1/2 teaspoons flour mixture to lightly coat; set aside the flour mixture and the blueberries.
  2. In the bowl of an electric mixer beat butter, granulated sugar and brown sugar on medium-high speed until light and fluffy, about 3 minutes. Add eggs, one at a time, beating until combined. Mix in vanilla.
  3. With the mixer on low speed, add reserved flour mixture, beating until just combined. Add milk, beating until just combined. Do not overmix. Using a rubber spatula, fold in the cranberries. Fold in orange zest. Divide batter evenly among the prepared muffin cups. If desired, sprinkle a little turbinado sugar on top of each muffin.
  4. Bake, rotating pan halfway though, until muffins are barely golden and a cake tester inserted in the center of one muffin comes out clean, about 20 minutes. Let cool briefly then carefully (and quickly) remove muffins from pan onto cooling rack.  Serve warm or at room temperature.
Adapted from Martha Stewart's Favorite Blueberry Muffins